Dave McD's
PBF (Pizza Box
Flyer)
 Original design inspired from an idea
by my buddy John Petersen (Foamguy),
and developed with input from a thread on
RC Universe.Com
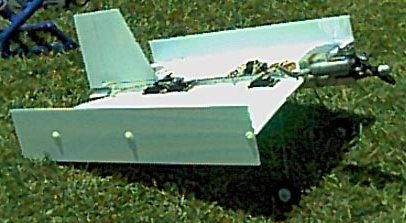
Type: Indestructible Flying Wing.
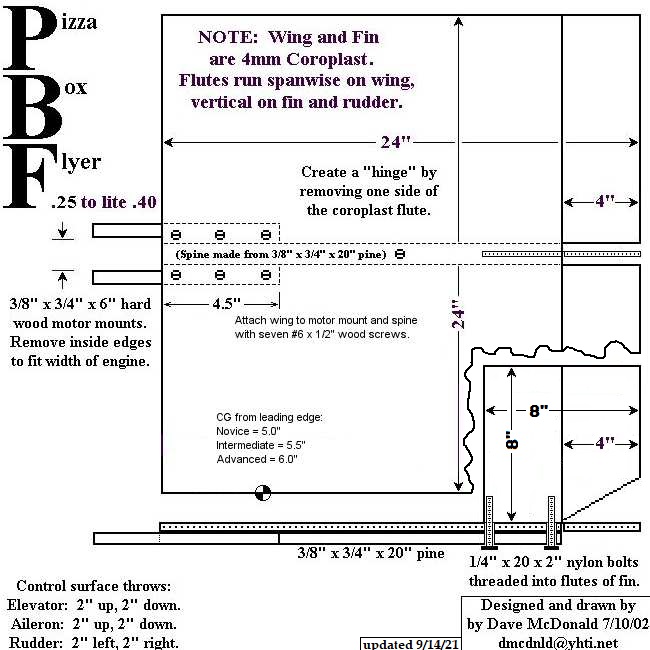
Materials: 4mm Coroplast, pine/oak, alumimun.
Wingspan: 24"
Wing length: 24". (4" are moveable elevons.)
Wing area: 576 square inches.
Airfoil: Symmetrical (Hey, it's flat!)
Vertical tail: 6"x6", (3" is moveable rudder.)
Fuselage: 3/8" x 3/4" x20" pine,
Motor mount: Hardwood (pine or oak)
Landing gear: None.
CG: 5.5" to 6.0" back (23%-25%)
Channels: 4. (elevons, throttle, rudder.)
Engine: OS 40FP with Grish 10x4 prop.
Fuel tank: 4 ounce.
Radio: Futaba S-148 servo (x4), R-127DF Rx,
4.8 volt 270 mah battery.
Weight: 2 pound, 8 ounces.
What is a PBF?
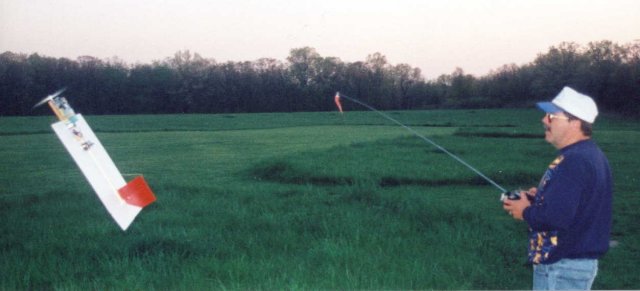
A PBF is a nearly indestructible square and flat flying wing that easily
performs extremely tight and quick aerobatic maneuvers at super slow flying
speeds.......and it only costs about $5 of parts and a few hours of labor to build.
Flying a PBF feels like flying an extremely maneuverable overpowered feather.
I've had more fun with this simple little plane than any other RC plane I've ever owned or
flown! And after flying RC planes since 1969, that's a LOT of planes!
The PBF Story
The idea of a square flying wing started out as brainstorm by my internet buddy, John
"Foamguy" Petersen. John built an experimental OS .40LA powered
"Squareplane" with an airfoiled coroplast wing and posted a picture of it in
flight on RC Universe.Com under a
thread called the "Flying Pizza Box". If you browse through my RC Air Force,
you'll no doubt notice that I love flying wings. The idea of a square flying wing sounded
like fun, so I put everything else on hold and started workng on my own version of John's
Flying Pizza Box. It ended up flying so much better than expected that I posted
detailed photos of it on RC
Universe.Com so others could build one too. Shortly thereafter, the Flying Pizza
Box thread caught fire, soon followed by the Pizza Box Flying thread, and then the Build
Your Own PBF thread.
Reading through these old threads will explain a lot about the history of how John's
original Flying Pizza Box evolved into what has become known on RC Universe.Com as the PBF. And
if you're seriously considering building a PBF of your own, take the time to read through
these old threads because they contain a wealth of information that isn't included on this
web site, especially the first one.
"Build
Your Own PBF" RCU thread
"Flying Pizza Box" RCU thread
"Pizza Box Flying" RCU thread
"Dave McDonald the Father of Pizza Box Fliers?" RCU thread
Those threads also proved that John and I aren't the only "weird guys who like cool
stuff"......errrrr...... I mean "cool guys who like weird stuff".
Thank you John "Foamguy" Petersen for getting me started on this PBF project!
I love this plane!!!
NEWSFLASH!!!
10/07/02
After some arm twisting by Dean "Tattoo" Tuinstra of S.P.A.D. fame,
the PBF now has it's own forum topic on SPAD
World.Net,
the official discussion forum of the S.P.A.D. (Simple Plastic Airplane Designs) web site.
If you're looking for the latest information about the PBF and other similar
planes,
be sure to check out the PBF
forum on SPAD World.Net.
UDDATE 4/4/03:
The PBF seems to have sparked an interest in developing other SPAD 3D and Fun Fly designs,
such as the QHOR by Dean "Tattoo" Tuinstra. As a result, the old PBF forum on SPAD World.Net has been renamed to SPAD X-Treme....3D and Fun
Fly in order to include other highly maneuverable SPAD fun fly designs, such as the
QHOR.
Flexible Flat Flying Wing = Fun Flyer's
Fantasy
OK, it's just a single flat piece of 4mm (3/16") coroplast that I mail ordered from Harbor Sales. But the PBF is
an absolutely amazing airplane! The PBF will do tight inside/outside loops,
extremely tight turns, quick rolls, upright/inverted spins, flat spins, hovers, torque
rolls, and it slow-flys better than any other plane I've ever flown. For on the deck
3D flying, or hovering around at ridiculously slow speeds, the PBF is the best I've seen
yet. In fact, the PBF has proven to be one of the most enjoyable RC planes I've ever
flown in my 33 years of RC airplanes.
PBF + Indestructible = Fearless
Flying
 The PBF has also proven to be nearly indestructible. In fact, the more I fly it, the
more the PBF reminds me of a Realflight plane instead of a real plane. Unlike any of my
other RC planes, I've pretty much lost my fear of damaging the PBF in a crash......which
is one of the things that makes it so much fun to fly! If you dork the PBF, you
usually just restart the engine and go flying again....sort of like the spacebar on
Realflight.
The PBF has also proven to be nearly indestructible. In fact, the more I fly it, the
more the PBF reminds me of a Realflight plane instead of a real plane. Unlike any of my
other RC planes, I've pretty much lost my fear of damaging the PBF in a crash......which
is one of the things that makes it so much fun to fly! If you dork the PBF, you
usually just restart the engine and go flying again....sort of like the spacebar on
Realflight.
The PBF has proven to be so rugged and capable of flying so slow that we've been using
them for full contact combat. Here's my PBF #1 bumping Tim's PBF from below.
Unfortunately, when my PBF bumped Tim's PBF, it killed my engine and PBF #1 fell to the
ground......undamaged of course. But the most fun we've had with PBF Combat has been
"Prop Blast Fighting", where you try to position your PBF so the prop blast
knocks the enemy PBF to the ground. (Video link to "Prop Blast Fighting"
Combat is at bottom of this page.)
If you love to fly 3D with the profile or competition fun fly type planes, then you will
love flying a PBF! I love to horse around with my Stickit IV at
extremely low altitudes, but the fear of crashing it still prevents me from trying certain
maneuvers at ground level. The OS 40FP powered PBF will do most all of these same
close in maneuvers and more, but without the fear of damaging it in a crash. In
fact, I've completely lost my fear of the PBF hitting the ground if I screw up a
maneuver. This has given me the confidence to attempt some maneuvers with the PBF
that I still only dream about doing with my Stickit.
Like the Stickit
type planes, the PBF isn't meant to be flown fast, and would probably become
uncontrollable at flat out speeds, especially if using a .40 size engine. Instead
the PBF flys best with the nose of the plane pointing up anywhere from a 30 to 75 degree
angle, which is usually referred to as High Alpha Flight. In high alpha flight, the
PBF depends heavily on the prop blast to stay airborne. And at these super slow
speeds, the prop blast over the elevons is also needed to maintain pitch and roll control
in very nose high flight.
PBF + 3D = Fearless 3D
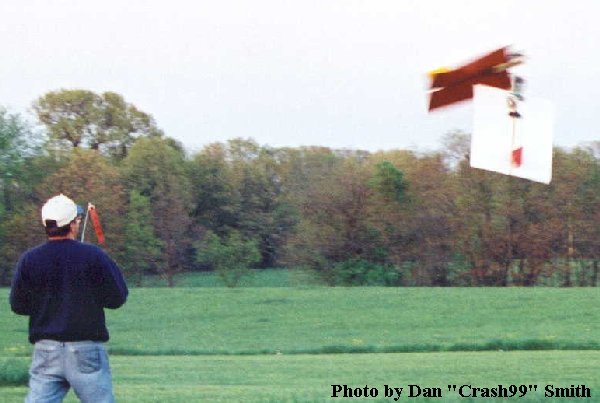
Lately I've been having a ball doing "Catch and Goes" with my PBF. As the
PBF slowly passes beside me, I reach out and grab the wingtip. Then relaunch it
with a sidearm toss. In fact, by truly hand launching the PBF like a Frisbee,
complete with the wrist-flick, the PBF can be directly hand launched into a single barrel
roll. It looks like a really bad hand launch, but the PBF completes the full barrel
roll without even touching the sticks. It looks scary, but it's not, which makes it
even more fun! (Video links to PBF "Catch and Goes" and the "Barrel
Roll Launch" are at bottom of this page.)
The PBF will easily roll with full aileron deflection while hanging on the prop. In
fact, the PBF will even do a true torque roll without cheating with the ailerons, but I'm
not good enough yet to hold it there for more than 2 or 3 turns. And since the PBF
is almost indestructible, you can afford to do these hanging rolls less than a foot off
the ground if you feel like it. It almost makes you feel like Quique
Somonzini.........well.....maybe for a few nanoseconds at least. (Video link to PBF
Torque Rolls at bottom of this page.)
PBF + Fearless =
Overconfidence
Since I no longer have any fear of damaging the PBF in a crash, I've also been
experimenting with loops, super tight turns, hovering, and maneuvering the PBF in low
level inverted flight just to see what it's capable of doing.......and to find out what
I'm capable of doing. Needless to say, I've dumped the PBF into the ground many
times attempting this kind of risky flying, but at the most the damage has been a broken
prop, and an occasional cracked motor mount beam. But usually there is no damage at
all.....especially when using the flexible nylon props such as the Grish. My Stickit would have
been reduced to splinters by now if I would have treated it like this.....which is exactly
why I haven't attempted this stuff with my Stickit. (Video
link to stupid PBF stunts at bottom of this page.)
PBF Spins and Spin Recovery
Spins and flat spins with the PBF are a whole new world of fun, but the spin recovery
technique on a PBF is exactly backwards from the technique on a "normal"
plane. At first, my PBF would sometimes enter an unintentional spin. It
finally dawned on me that the usual cause of these unintentional spins was making large
rudder inputs at very slow speeds while the elevator was nearly at neutral. This
sometimes causes the PBF to enter a violent and tight spin....sometimes upright.....and
sometimes inverted. To recover, the first thing you have to determine is whether
it's an upright spin, or an inverted spin.
To get out of an Upright spin, apply full UP (yes, UP) elevator control, and add power. If
it still won't come out, leave the full UP elevator in there and try adding rudder in the
SAME direction as the spin until the PBF transitions from an out-of-control spin into a
tight spiraling turn. Once it begins spiralling instead of spinning, you can easily
resume flying from there. But if you give it full down elevator in an upright spin,
it will continue to spin all the way to the ground.
To get out of an Inverted spin, apply full DOWN (yes, DOWN) elevator control, and add
power. If it still won't come out, leave the full DOWN elevator in there and try adding
rudder in the SAME direction as the spin until the Pizza plane transitions from an
out-of-control spin into a tight spiraling turn. And again, once it begins spiralling
instead of spinning, you can easily resume flying from there. But if you give it full up
elevator in an inverted spin, it will continue to spin all the way to the ground.
Want to see the PBF do an inverted flat spin? With the PBF nearly vertical and
hanging on the prop, apply full right aileron control and a just a little bit of up
elevator. This will often cause the PBF to enter and maintain a very flat inverted
spin if you keep the stick at full right aileron with just a touch of up elevator.
Sometimes adding full right rudder helps to enter the Inverted Flat Spin.
To get out of an Inverted Flat Spin, neutralize the rudder and aileron, then quickly apply
full power and full down elevator at the same time, making sure that the aileron controls
are neutralized. The PBF will instantly exit the flat spin and enter a tight outside
loop. After flying through 1/2 of the outside loop, pull back on the elevator stick
to get it flying right side up again.
Please note that these spin recovery techniques are backwards from a normal plane.....but
they work great on the PBF. Once you figure out how to enter and exit these spins on
command, they are a lot of fun!.....especially trying to see how low you can go and still
recover from Inverted Flat Spins! (Video link to PBF Spins, Spin Recovery
Techniques, and oops-I-waited-too-long-to-get-out-of-this-flat-spin at bottom of this
page.)
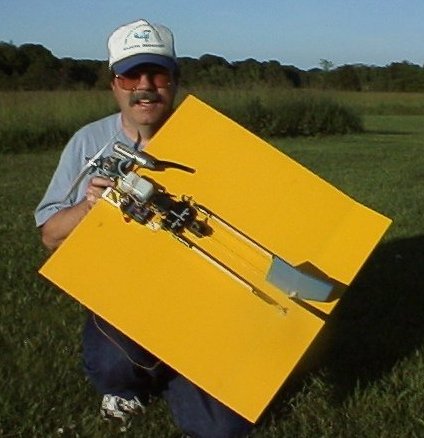
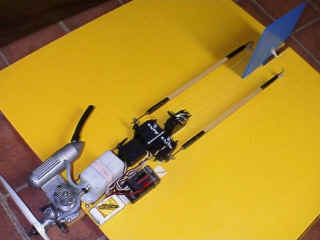
PBF #1
 Here's my first version of the PBF that was inspired by
John's Flying Pizza Box. But where John built an airfoiled wing by forming two
sheets of 2mm coroplast around a spar, I decided to go with a single flat piece of
4mm (3/16") coroplast for the wing. This made the PBF lighter, much simpler and
easier to build, and much easier to mount the motor. I've been mail ordering my 4mm
coroplast from Harbor Sales, but
your local sign making business will have it too.
Here's my first version of the PBF that was inspired by
John's Flying Pizza Box. But where John built an airfoiled wing by forming two
sheets of 2mm coroplast around a spar, I decided to go with a single flat piece of
4mm (3/16") coroplast for the wing. This made the PBF lighter, much simpler and
easier to build, and much easier to mount the motor. I've been mail ordering my 4mm
coroplast from Harbor Sales, but
your local sign making business will have it too.
PBF #1 was powered by an HB .15, and weighed 1 lb., 12 oz. with three Futaba S-133
servos, a 110 mah battery, and an antique Royal AM receiver. Even though it didn't
have a rudder, it flew great! It could loop, roll, fly inverted, and fly around in
high alpha flight with the nose pointing up at over 60 degrees. It flew so well,
that I posted detailed photos on RC
Universe.Com of this plane so others could build a PBF of their own. After that,
many more people started building their own versions of the PBF, and each one was a little
different. Over time, the PBF began to evolve to it's current state of the
art......and the PBF is still evolving.
PBF + Hovering = No-Brainer
 The PBF was a LOT more fun to fly after I added another S-133 servo, a
rudder, and replaced the HB .15 with an old OS bushing .25 engine! The rudder and
the extra power of the OS .25 made the PBF even more maneuverable, and much more fun to
fly. The improved PBF would now easily loop both inside and outside, spin both
upright and inverted, roll, hover, and even hang on the prop. But consecutive max
performance loops would bog down the OS .25, and it would barely climb out of a vertical
hover. It was fun to fly, but I wanted more power, without adding much more
weight. Experience had also revealed some areas that needed to be stronger, and
other areas that were over-built and could be lightened and/or simplified. So a
second PBF was designed and built.
The PBF was a LOT more fun to fly after I added another S-133 servo, a
rudder, and replaced the HB .15 with an old OS bushing .25 engine! The rudder and
the extra power of the OS .25 made the PBF even more maneuverable, and much more fun to
fly. The improved PBF would now easily loop both inside and outside, spin both
upright and inverted, roll, hover, and even hang on the prop. But consecutive max
performance loops would bog down the OS .25, and it would barely climb out of a vertical
hover. It was fun to fly, but I wanted more power, without adding much more
weight. Experience had also revealed some areas that needed to be stronger, and
other areas that were over-built and could be lightened and/or simplified. So a
second PBF was designed and built.
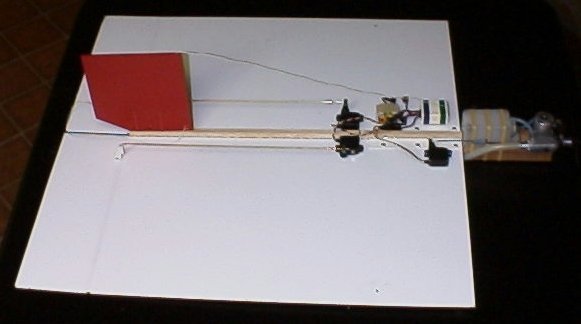
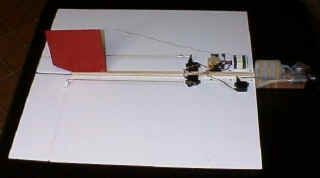
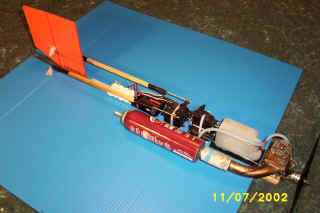
PBF #2
 My second PBF incorporated several major
construction improvements. The spine was moved to the bottom of the wing, and was
built from a piece of 1/2" aluminum U-Channel. This allowed the spine to fully
extend from the leading edge to the hinge line. Moving the spine under the wing made
it simple to fasten the motor mount beams directly to the spine, which further
strengthened the structure. The bottom mounted spine also made it easy to fasten the
fin/rudder with a couple of 1/4" x 20 nylon screws, which in turn secured the rear
section of the 4mm coroplast wing to the spine itself.
My second PBF incorporated several major
construction improvements. The spine was moved to the bottom of the wing, and was
built from a piece of 1/2" aluminum U-Channel. This allowed the spine to fully
extend from the leading edge to the hinge line. Moving the spine under the wing made
it simple to fasten the motor mount beams directly to the spine, which further
strengthened the structure. The bottom mounted spine also made it easy to fasten the
fin/rudder with a couple of 1/4" x 20 nylon screws, which in turn secured the rear
section of the 4mm coroplast wing to the spine itself.
The motor mount beams were originally made from pine, but later replaced with beams made
from oak. The motor mount beams were fastened directly to the aluminum U-channel,
creating a much stronger unified structure. The stronger motor mount and spine
assembly no longer needed a doubler on top of the wing, so the plastic doubler used in the
first PBF was eliminated. To further speed up construction time, no glue was used.
Everything was fastened with either screws, double-stick foam tape, velcro, or
zip-ties. These improvements dramatically simplified and sped up the construction,
while increasing the overall strength of the PBF #2.
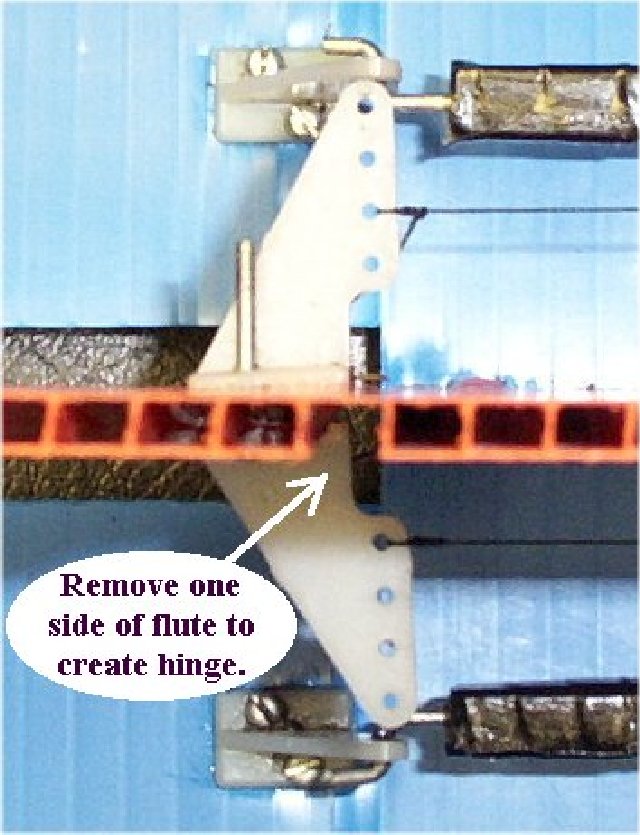
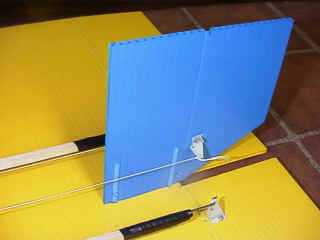
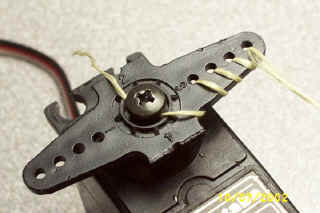
Coroplast Hinges

Making hinges in coroplast is extremely easy!
Just follow these simple step by step instructions
Step 1: Locate the flute nearest the desired hingeline.
Step 2: Cut and remove the material on one side of the flute.
Step 3: Leave the opposite side of the flute intact.
Step 4: Presto! You've just created an instant and durable hinge!
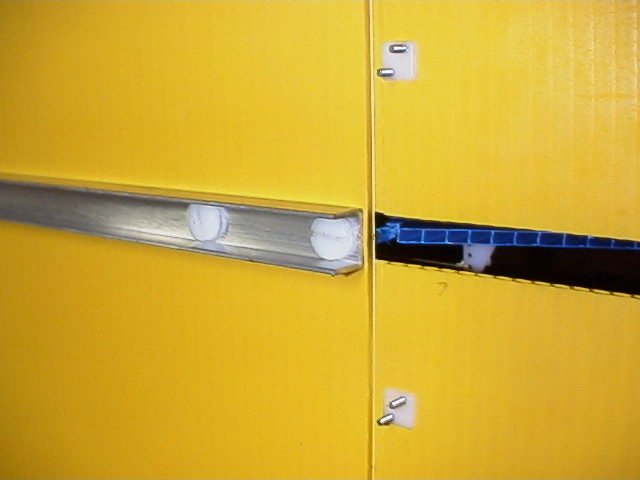
Bolt-On Vertical Fin
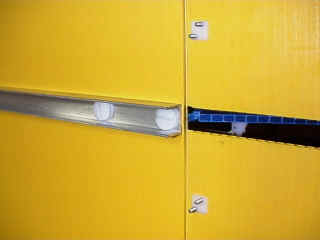 The 1/4 x 20 x 2" nylonbolts
pass through the
The 1/4 x 20 x 2" nylonbolts
pass through the
U-channel, then through the 4mm coroplast wing,
and end up threading into the flutes of the vertical fin.
This holds the rear of the wing tightly to the U-channel,
while securing and automatically aligning the
4mm coroplast vertical fin.
It works great!
Mounting the Servos
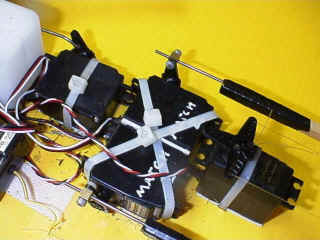 Figure out the locations of the servos using the
photos of PBF #2 and PBF #3 as a guide.
Figure out the locations of the servos using the
photos of PBF #2 and PBF #3 as a guide.
Clean the coroplast and the servo case with rubbing alcohol and let thoroughly dry.
Use 1/2" wide by 1/16" thick double stick foam mounting tape to fasten the
servos to the coroplast. Use one strip on the bottom of a servo, and two strips on
the side of a servo. (Wal-Mart carries rolls of double stick foam tape in the
masking tape and duct tape section.)
To make sure the servos stay stuck to the foam tape, especially in hot weather, poke some
holes through the coroplast as needed so you can zip tie each servo to the wing.
Don't rely solely on the double stick foam tape, or solely on zip ties or the servos
could shift their positions, resulting in constant trim changes.
Mounting the Receiver & Battery
Mount the receiver with 1/2" wide sticky backed velcro strips. (Available from
Wal-Mart in the sewing section). Be sure to clean the coroplast wing and receiver
case with rubbing alcohol before applying the velcro strips. Use a single strip of
the hook material on the wing, and a single strip of the loop material on the bottom of
the receiver case. The idea here is for the receiver to stay put.....but also be able to
wiggle freely enough to isolate it from the engine vibration. With 270 ma and smaller
batteries, the same velcro mounting method also works great!
Don't think velcro is strong enough to hold a receiver or battery?
Just wait until you try removing them!
Mounting the Fuel Tank
Try to keep the fuel tank as close as possible to the engine to avoid fuel draw problems
during nose high flight.....which is pretty much the whole flight.
Mount the fuel tank with velcro the same way as the receiver and battery. The sewing
section of Wal-Mart also has some sticky backed "Industrial Strength Velcro"
that is about 2.5" wide. This works great for the fuel tank, and also works
great for mounting standard size battery packs.
Or install some hooks on either side of the fuel tank, place some foam rubber under the
tank, and use a single #64 rubber band to hold it all in place.
Mounting the tank with velcro or a rubber band will keep the fuel from foaming.
Don't use zip ties, glue, or too many rubber bands to fasten the fuel tank or the engine
vibration will cause the fuel to foam......which will result in erratic engine runs.
Programming the Radio
The goal here is to set the travel adjustments and the dual rates so that a full up or
full down stick command runs both servos to their maximum travel allowed by the
transmitter, and a full left or full right aileron command will also run both servos to
their maximum travel allowed by the transmitter. When the servo travel settings and
the dual rate settings are correct, combining an elevator and aileron stick command on the
high rate setting will simply cause one servo to travel back towards neutral, while the
other servo won't move at all since it was already at it's maximum travel.
NOTE: Mechanical adjustments are then made to get the proper initial elevon throws
of 2" up, and 2" down.
The following recommended settings should be fairly close,
but may require some tinkering with the high dual rate settings to actually achieve the
goal stated above.
**********************************************************************
Futaba (Hitec)
Activate the ELEVON program.
Set the elevator, aileron, and rudder ATV (EPA) adjustments settings to the maximum, (140%
on the 8U and 9C, and 120% on the 7U and 6X).
Set the elevator, aileron, and rudder HIGH RATE adjustments to 100%, and adjust all LOW
RATE settings to 60%.
Adjust all ELEVON mix settings to either 100% or -100%, depending on the direction of
travel of the servos needed to get the proper direction of elevon throws.
Adjust the EXPO setting on the elevator, aileron, and rudder to -60% on HIGH RATES, and
-40% on LOW RATES.
(Note: Futaba and Hitec use NEGATIVE values for EXPO.)
**********************************************************************
JR
Set the wing type to DELTA.
Set the elevator, aileron, and rudder TRAVEL ADJUSTMENT settings to the maximum, (150%).
Set the elevator, aileron, and rudder HIGH RATE adjustments to 100%, and adjust all LOW
RATE settings to 60%.
Adjust the EXPO setting on the elevator, aileron, and rudder to 60% on HIGH RATES, and 40%
on LOW RATES.
(Note: JR uses POSITIVE values for EXPO.)
**********************************************************************
Airtronics
From the "ETC" menu, select the ADVANCED program mode.
Scroll down and switch the DELTA flight mode to ON.
Set the elevator, aileron, and rudder EPA settings to the maximum, (150% on the RD6000).
Set the elevator, aileron, and rudder HIGH RATES to 130%, and adjust all LOW RATES to 80%.
Adjust the EXPO setting on the elevator, aileron, and rudder to 60% on HIGH RATES, and 40%
on LOW RATES.
(Note: Airtronics uses POSITIVE values for EXPO.)
(Airtronics setup info courtesy of my buddy Pepe, the first PBF pilot in Mexico.)
Control Linkages
 The 1/4 x 20 x 2" nylon bolts thread into the
flutes of the vertical fin to secure it. These nylon bolts also serve to hold the
rear wing section tightly to the spine.
The 1/4 x 20 x 2" nylon bolts thread into the
flutes of the vertical fin to secure it. These nylon bolts also serve to hold the
rear wing section tightly to the spine.
The pull-pull threads are tied to the rudder control horns. I've tried Kevlar, upholstery
thread from Wal-Mart, and 6 lb. test monofilament fishing line. The upholstery
thread has proven to work the best, and it's dirt-cheap at 150 yards for less than two
dollars.
Z-bends were used at the elevon control horns instead of clevises. If necessary,
adjustments can be made at the EZ connector on the servo arm. Linkages are simple,
lightweight, and cheap!
Light and Rigid Pushrods
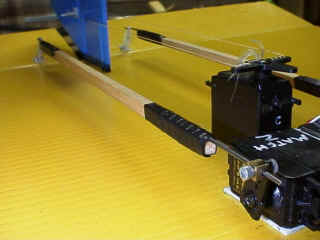 The elevon pushrods are made from 1/4" square
hard balsa to eliminate flexing when they are pushing on the elevons. An L-bend in the
wire is inserted into a hole in the balsa about 1.5" from the end. Apply a
little medium CA where the wire lays on the balsa, and then wrap the end with electrical
tape. The longer you make the balsa pushrod, the less chance the pushrod will bend and
flex when pushing on the elevons. And since the balsa is light, it just might save
your servo's gear train in a crash.
The elevon pushrods are made from 1/4" square
hard balsa to eliminate flexing when they are pushing on the elevons. An L-bend in the
wire is inserted into a hole in the balsa about 1.5" from the end. Apply a
little medium CA where the wire lays on the balsa, and then wrap the end with electrical
tape. The longer you make the balsa pushrod, the less chance the pushrod will bend and
flex when pushing on the elevons. And since the balsa is light, it just might save
your servo's gear train in a crash.
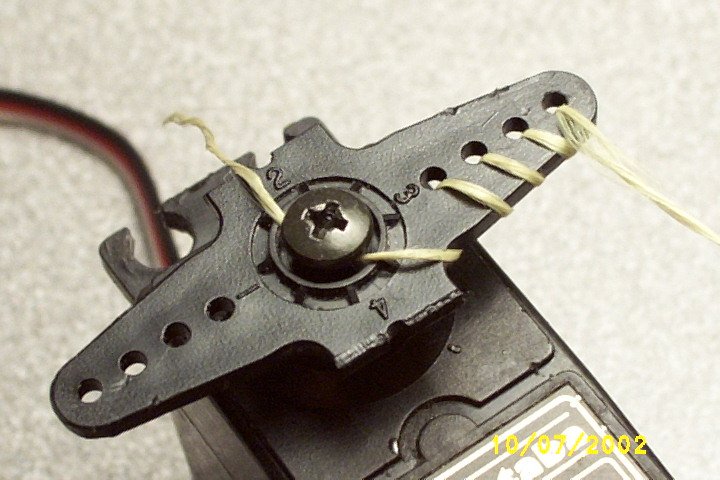
Super Simple Pull-Pull Setup
 The pull-pull linkage is first started by tying a thread to each of the rudder control
horns. Cut the thread to length at least 6 inches past the servo arm. Now lace
the thread through all of the holes in the servo arm, starting with the outer hole, and
ending up with the inner hole. You should end up with several inches of thread
leftover after finally passing through the inner hole.
The pull-pull linkage is first started by tying a thread to each of the rudder control
horns. Cut the thread to length at least 6 inches past the servo arm. Now lace
the thread through all of the holes in the servo arm, starting with the outer hole, and
ending up with the inner hole. You should end up with several inches of thread
leftover after finally passing through the inner hole.
With the servo in the neutral position, and the servo arm straight across, and the rudder
in the neutral position, pull the slack out of one of the threads. Then pull the
slack out of the other thread until the rudder stays in the neutral position.
Finally the ends of each of the threads are secured by passing each of the threads
underneath the head of the servo arm hold down screw, and then tightening the screw.
Again, I've tried Kevlar, 20 lb. test Spiderwire, 6 lb. test monofilament fishing line,
and upholstery thread from Wal-Mart. The upholstery thread has proven to work the
best by far, and it's dirt-cheap at 150 yards for less than two dollars.
NOTE: Do not wrap the threads much more than 1/2 turn around the screw or the pull-pull
thread may get cut by the screw threads as the screw is tightened. The idea here is
to simply pinch the thread between the screw head and the servo arm.
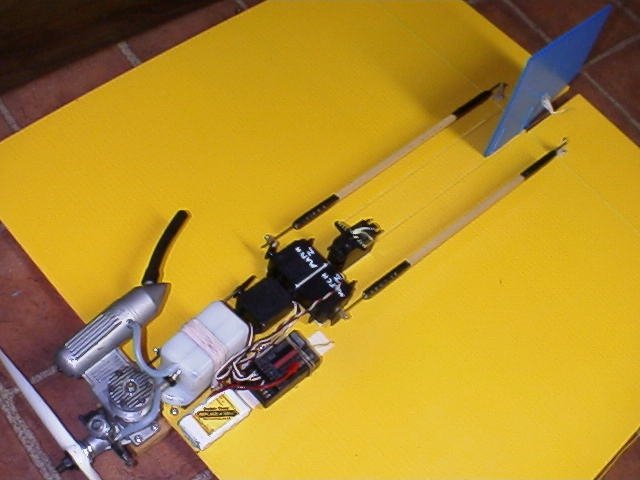
PBF + OS 40FP = FUN
 To power PBF #2, I chose an OS 40FP. The OS 40FP weighs
the same as the expen$ive ball bearing .25 to .32 size engines, and has similar usable
power. For many years, the OS 40FP has been one of my favorite engines for sport
flying the Stickit
type planes due to it's excellent running and throttling characteristics. Since the
PBF is basically a hovering and 3D plane, I figured an OS 40FP would work just as well on
a PBF. Also I wanted to see if the weight of using a standard size airborne radio
would adversely affect the flight performance......(It didn't!)
To power PBF #2, I chose an OS 40FP. The OS 40FP weighs
the same as the expen$ive ball bearing .25 to .32 size engines, and has similar usable
power. For many years, the OS 40FP has been one of my favorite engines for sport
flying the Stickit
type planes due to it's excellent running and throttling characteristics. Since the
PBF is basically a hovering and 3D plane, I figured an OS 40FP would work just as well on
a PBF. Also I wanted to see if the weight of using a standard size airborne radio
would adversely affect the flight performance......(It didn't!)
Servos are Futaba S-148, receiver is a R-128DF, but the battery is a 270 mah from Radio
Shack. The empty weight came out to be 2 lbs., 8 oz. Surprisingly, even though
the PBF #2 came out heavier than the first PBF #1, this second generation PBF #2 flew even
better! The extra power of the OS 40FP made a big improvement in the overall
maneurverability, giving PBF #2 plenty of reserve power to climb vertically out of hovers
and torque rolls, especially with a 10x4 prop.
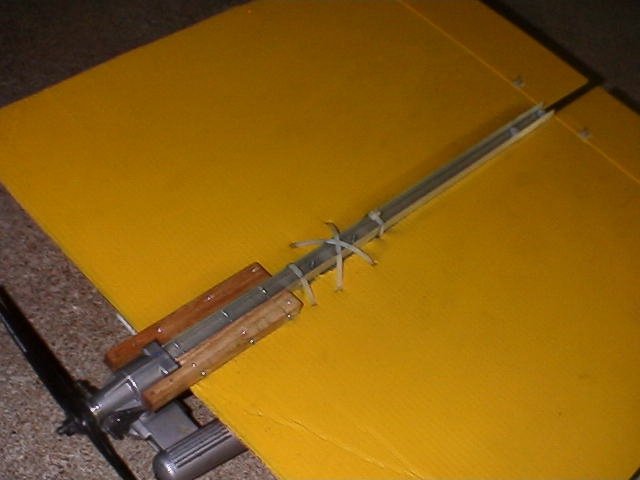
Improved Spine and Motor Mount
 On the third generation PBF, the aluminum spine was replaced with a much
lighter 3/8" x 3/4" pine spine. The motor mount beams are also made of
3/8" x 3/4" pine, but I'd recommend using oak or maple motor mounts. I
took a slight step backwards here and glued the motor mount beams to the spine, but these
are the only parts that are glued together. Everything else assembles with screws
just like the second generation PBF #2. The pine spine has proven to be plenty
strong enough, is at least a couple of ounces lighter, and always springs back to straight
after a crash unlike the aluminum U-channel.
On the third generation PBF, the aluminum spine was replaced with a much
lighter 3/8" x 3/4" pine spine. The motor mount beams are also made of
3/8" x 3/4" pine, but I'd recommend using oak or maple motor mounts. I
took a slight step backwards here and glued the motor mount beams to the spine, but these
are the only parts that are glued together. Everything else assembles with screws
just like the second generation PBF #2. The pine spine has proven to be plenty
strong enough, is at least a couple of ounces lighter, and always springs back to straight
after a crash unlike the aluminum U-channel.
In fact, the pine spine and motor mount assembly has worked so well, that I upgraded the
first version PBF #1 from a top mounted balsa spine to the bottom mounted pine
spine. And while I was at it, I replaced the OS .25 with a Webra .32 for awhile, but
later replaced the Webra 32 with a Norvel Big Mig 25 which made PBF #1 even more fun to
fly!
After breaking three motor mounts on PBF #2, the aluminum spine was also replaced with the
newer pine spine design. I'm guessing that the aluminum was too stiff and was
resulting in the motor mounts having to absorb all of the impact stress from a crash.
The pine spine is stiff enough to do the job, but apparently is flexible enough to
absorb some of the stress during a crash, thus saving the motor mounts from breaking.
Upgrading PBF #2 to a pine spine and motor mount resulting in a weight loss of a
couple of ounces. I also replaced the OS 40FP with a mousse can piped Thunder Tiger
Pro .36 engine. Although it doesn't throttle quite as well as the 40FP, the piped TT
36 gave PBF #2 a LOT more power! I really like the extra power, but I'm not sure the
loss of precision throttling is worth it. I need more flying time with PBF #2 to
decide for sure.
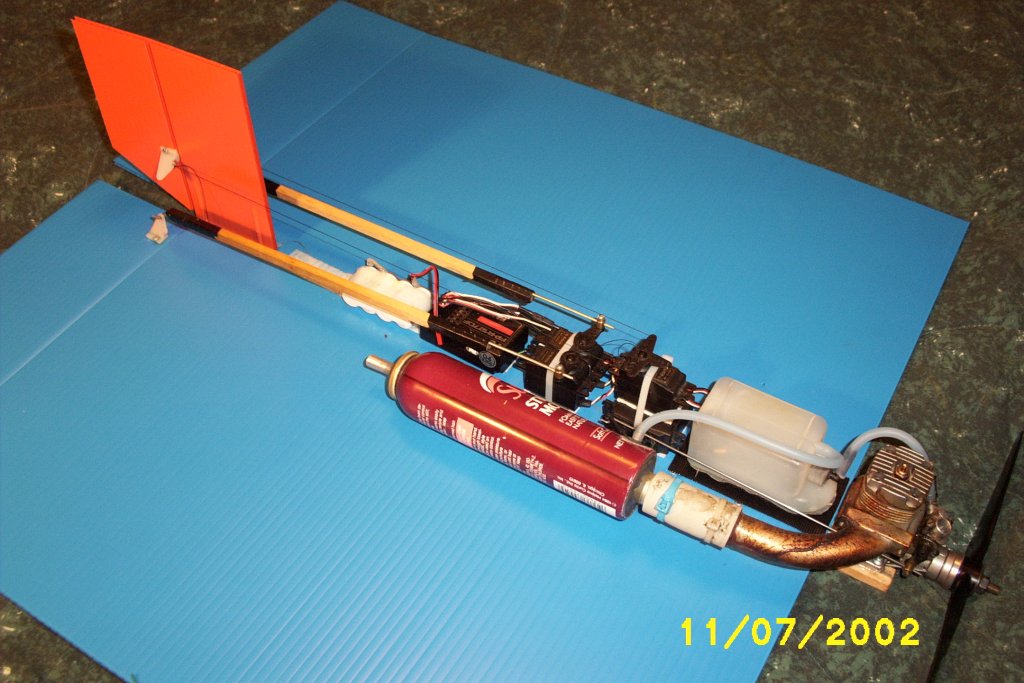
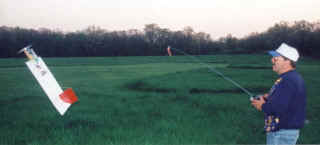
PBF #3
 PBF
#3 is powered by a TT 42GP with a Mousse Can Pipe (MCP), spinning a 10x4 MA prop.
The radio was arranged to clear the MCP by laying the throttle servo behind the tank, then
attaching the rudder servo on top of the throttle servo. The elevon servos were
mounted upright to keep them as close to the center as possible to avoid interfering with
the MCP.
PBF
#3 is powered by a TT 42GP with a Mousse Can Pipe (MCP), spinning a 10x4 MA prop.
The radio was arranged to clear the MCP by laying the throttle servo behind the tank, then
attaching the rudder servo on top of the throttle servo. The elevon servos were
mounted upright to keep them as close to the center as possible to avoid interfering with
the MCP.
Airborne uses a Futaba 127DF rx, 270mah 4.8 volt battery, Futaba S-128 on throttle, Futaba
S-132H high speed BB servos on elevons and rudder. Dry weight is 2 lbs, 6 ounces. A
strip of Velcro runs between the elevon servos and the fin so I can rearrange the receiver
and battery to change the CG. PBF #3 is now flying with the CG at 6.0" back
from the leading edge.
The rubber bands holding the fuel tank were replaced with some "Industrial Strength
Velcro" that I bought at Wal-Mart. It worked so well, that I converted PBF G2
to a velcro fuel tank mount.
The TT 42GP with the MCP runs and throttles just as well as the OS 40FP, but has
considerably more power. Vertical acceleration from a hover or torque roll is
unreal, and it easily powers it's way through continuous high drag maneuvering. PBF
#3 with the TT 42GP and MCP is fast becoming my favorite of the three PBFs I currently
have flying.
I made about 20 kits of the PBF #3 for my local flying buddies. Within just a few
weeks they were all sold out. In the Lake of the Ozarks area, the PBFs are
spreading!
PBF Plans
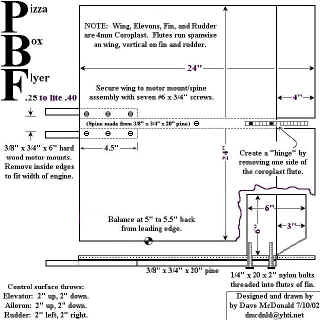
Would you like to build a PBF? Click on the plans to enlarge
them. When combined with this web page, these plans should give you enough
information to build and fly your own PBF.
Need an Elevon Mixer?
To get the maximum enjoyment out of flying a PBF, a computer transmitter
with elevon mixing works best. But for those of you who don't have a computer
transmitter and still want to fly a PBF, I've got great news!
I recently stumbled upon a neat little electronic elevon mixer from Bill-Tek Electronics that works
perfectly in a PBF! It's a small lightweight electronic device that plugs inbetween
the receiver and servos that mixes the aileron and elevator commands to give elevon
control. In fact, I bought a couple of these electronic elevon mixers just to see
for myself how well they would work in a PBF, and they worked great!
The Bill-Tek Electronics elevon
mixer is lightweight, simple to use, and is very inexpen$ive. For example, the kit
version of the Bill-Tek Electronics
elevon mixer only cost $11.00, plus a few bucks shipping. Even the factory assembled
electronic elevon mixer from Bill-Tek
Electronics only costs $17.00, plus a few bucks shipping.
If you're looking for an inexpensive electronic elevon mixer to get a PBF flying with a
non-computer transmitter, the one from Bill-Tek
Electronics would be hard to beat.
Questions? Click on this link to send
Bill an email to ask about getting an Elevon Mixer for your PBF. And
please let Bill know that you found out about his elevon mixer on this PBF web page.
PBF Action Videos Now Online!
My buddy Shaun "Mud Duck" Zimmerman has posted several photos and videos of
these three PBFs in action on the Jefferson
City Radio Control web site under the Club News section.
Shaun's videos show my PBFs doing loops, spins, rolls, slow flight, hovers, torque rolls,
touch and goes, catch and goes, prop-wash combat, and even crashing. Also shown are
a few different methods of hand launching a PBF, including a barrel roll hand
launch. And there is also a video of Shaun flying his own PBF for the very first
time.
Here's the link to Shaun's
PBF Photos and Videos, Page 1 if you want to see all three of my PBFs in action,
including loops, rolls, spins, hovers, touch and goes, catch and goes, and torque rolls.
Here's the link to Shaun's
PBF Photos and Videos, Page 2 that shows the Norvel 25 powered PBF#1 doing some low
level wild and crazy flying....including taking off and landing from a folding chair.
Here's the link to Shaun's PBF Photos
and Videos, Page 3 that shows the Norvel 25 powered PBF#1 doing some windsock touch
and goes,
plus a 36"x36" Super PBF that was built and flown by my nephew, Bryan.
Here's the link to Shaun's
PBF Photos and Videos, Page 4 that shows the TT 42GP powered PBF#3 doing some wild and
crazy flying, plus a brief glimpse of PBF combat with streamers.
NOTE: You may need to update
your Windows Media Player in order to view the videos.
If that doesn't work, try using Quicktime 4.0 to play the videos.
PBF Alter Ego
 If you liked my PBF web page,
you will also want to check out a similar square flying wing by James Goss that he calls a
flying Postage Stamp.
If you liked my PBF web page,
you will also want to check out a similar square flying wing by James Goss that he calls a
flying Postage Stamp.
James has been experimenting with his own version of a square flying wing by adding
landing gear, wingtip plates, dual rudders, dual elevons, pusher engines, flaps, and other
crazy stuff just to see what works.....and what doesn't. The popup ads on James' web
site are annoying, but worth the effort to find out what this creative genious is going to
try next!
Check out James Goss Model Aviation
for more information.
NOTE: If this page looks strange at times,
it's probably just me making changes again.
Comments?
E-Mail me at:
dmcdnld@yhti.net
(To Dave McD's PREDATOR)
(Back to R/C
Air Force)
(Home)
 The PBF has also proven to be nearly indestructible. In fact, the more I fly it, the
more the PBF reminds me of a Realflight plane instead of a real plane. Unlike any of my
other RC planes, I've pretty much lost my fear of damaging the PBF in a crash......which
is one of the things that makes it so much fun to fly! If you dork the PBF, you
usually just restart the engine and go flying again....sort of like the spacebar on
Realflight.
The PBF has also proven to be nearly indestructible. In fact, the more I fly it, the
more the PBF reminds me of a Realflight plane instead of a real plane. Unlike any of my
other RC planes, I've pretty much lost my fear of damaging the PBF in a crash......which
is one of the things that makes it so much fun to fly! If you dork the PBF, you
usually just restart the engine and go flying again....sort of like the spacebar on
Realflight.